Using karaoke is a great option for having fun. However, in order for the device to fully perform its functions, it is important to follow certain connection rules. Most often, the question arises of attaching a microphone to the equipment. Therefore, in this article we will analyze several ways that can certainly be useful to the user. In addition, we learn how to configure the unit.

In this case, of course, starting from the permissible expenditure of cash.
The standard way to connect a microphone
To begin with, we’ll analyze a fairly common method that a person who does not have special skills and knowledge will definitely cope with. So, below are the actions, and it is recommended to adhere to them:
- If we talk about the standard connectors in a laptop, then it is worth remembering the indicator of 3.5 millimeters. As for the direct output plug of the device, these are holes in the amount of two pieces. The first of them has a dimension of 6.5 mm, and the second - 3.5. Accordingly, we will use the last of them. Since for the use of non-standard output it is necessary to purchase a special adapter. It can be bought in stores designed for audio equipment.
ATTENTION. In no case can you connect a regular plug to a non-standard input. Otherwise, the breakdown of all equipment may result.
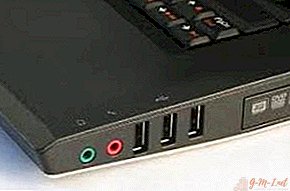 Thus, when everything is clear with the connectors, certain parts are in service, you can begin to connect the elements. To do this, you should find on the side panel of the laptop, in fact, the necessary recesses. The color of the connector, of course, directly depends on the manufacturer of the design, however, most often you can notice such inherent shades as orange or pink. Consequently, the next step is the introduction of the plug to a characteristic click.
- After that, a notification about the connection should be displayed on the device’s screen, and the icon will appear on the taskbar. Usually it is located near the specified time.
 Thus, when everything is clear with the connectors, certain parts are in service, you can begin to connect the elements. To do this, you should find on the side panel of the laptop, in fact, the necessary recesses. The color of the connector, of course, directly depends on the manufacturer of the design, however, most often you can notice such inherent shades as orange or pink. Consequently, the next step is the introduction of the plug to a characteristic click.
REFERENCE. To ensure that the construction works correctly, it is highly recommended that you restart your computer.
- Further, when the monitor lights up again, it will be necessary to reproduce the change in some settings. To do this, click on the "start" button and go to the "control panel" section. There, it is worth noting a line under the name "sounds and audio devices". You will have access to the “audio” tab, where you can go to the “volume” window by first clicking on “sound recording”. Where “microphone” is written, you can change the parameters, for example, increase the volume and so on.
IMPORTANT. After carrying out all the above manipulations, you must click on “OK”. This will fix the changed indicators.
Bluetooth connection
Thanks to modern technology, you can increasingly find a kit that is a microphone with a built-in speaker. It is this design that is installed due to bluetooth. The process of activation of the equipment itself is as simple as possible and involves the following actions:
- First of all, the unit turns on.
- Next, on the laptop, you need to click on the bluetooth icon. After which the list is highlighted, the necessary name should be noted in it. Pairing will only go after the speaker is selected as the main device for audio output.
Thus, as you can see, you do not have to connect the microphone itself.
- In conclusion, you should decide on the file, run it with text. Accepting a voice will be carried out independently in the same way as receiving a signal and mixing sound with vocals. Due to the fact that additional voice transmission to the speaker will not occur, the singing itself will not be delayed, of course.
REFERENCE. If the devices support any version of bluetooth, and not just one, then the one that was released earlier will take part.
As for the management, these are specialized buttons located directly on the device’s case. Most often this is the most common mixer. With its help, not only the volume of music and voice is regulated, but also the imposition of various effects. So there is the opportunity to create an interesting addition to the performance, for example, an echo or distortion.
IMPORTANT. Since the connection is wireless, and for karaoke microphones, an exclusively regular full-fledged “jack” is intended for wired ones, you will need to purchase an adapter for a “mini-jack”. If the laptop is not equipped with the presented bluetooth function at all, then you need to buy a special external module. Thanks to him, the system immediately recognizes devices and installs the necessary resources.

How to set up a microphone
This is done, respectively, after the microphone is connected and the device is ready for operation.
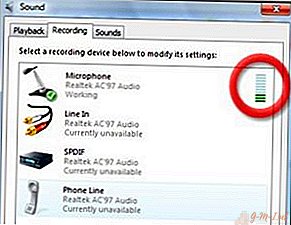 Thus, you should first go to the taskbar, where it directly requires you to click on the speaker icon. In the future, a window with the name "properties" will be available to you. In this section, the equipment will be configured.
- So, you need to refer to the line "levels".
- The indicator of the correct connection of the microphone to the main building will serve as finding the line of its settings in the search. To determine whether the mechanism is currently enabled or disabled, you should refer to the icon near the “balance” button. If you see that it is crossed out with a red line, then activation has not occurred.
- Therefore, you must click on it to start the process.
- And now, using the mixer, you can directly adjust the sound of the microphone.
 Thus, you should first go to the taskbar, where it directly requires you to click on the speaker icon. In the future, a window with the name "properties" will be available to you. In this section, the equipment will be configured.
REFERENCE. The presented instruction is intended exclusively for windows 7 users.
- For owners of older models a slightly different algorithm of actions is made. It is necessary to connect the device connector to the output of the sound card.
- Then click on “start” and select “control panel”.
- Then you should find the “sound” department in the settings. It should be double-clicked.
- You are automatically transferred to the "speech" section, where, in fact, you will need to mark the "volume", and then go to the "properties". Changes are made here. Now that you have chosen the appropriate parameters for yourself, do not forget to set “ok” to save the data.
- In conclusion, you can install a special program for karaoke and enjoy leisure activities.
How to connect a karaoke microphone to speakers through a laptop
To do this, the following list of steps is presented that will definitely help you achieve the result. IMPORTANT! The instruction is valid exclusively for owners of windows 7, to others, respectively, the method does not fit.
 Therefore, first you need to click on the icon that is located directly in the notification area.
- Then you should mark the line under the name "sounds". The highlighted window will be available for you, where it is necessary to click on the "record".
- Next, you must definitely find your device in the list, which will open after completing the previous steps. Most often, either the name of your equipment is displayed, or any part of it.
- To complete the procedure, double-click on the name with the right side of the mouse. Then select the line “properties”, and then “listen”. Then you need to click on the "listen from this device" section.
 Therefore, first you need to click on the icon that is located directly in the notification area.
ATTENTION. Do not forget to commit the changes using the "save" or "apply" button. Otherwise, previous manipulations will fail.
- At the very end, it is strongly recommended to double-check the fixed actions and try the design in working order. If the sound is directly output through the speakers, you have done everything reliably.
Thus, you can see that any connection method does not require special knowledge and skills from the master. Therefore, even a novice user can cope with the described work.

Leave Your Comment