 Since ancient times, bread and pastries have been stored in special wooden containers (boxes). bakery products in the breadbox stay fresh longer and do not stale. A modern fixture made in a factory way can be made of wood, plastic or metal. It meets its purpose, but a handmade product can become a real decoration of the kitchen interior.
How to make a bread box with your own hands
Before starting work, you need:
- sketch a drawing of a household item;
- prepare all the necessary tools;
- choose the right materials.
A preliminary sketch will allow you to make a more accurate drawing and imagine what the finished product will look like.
Materials and Tools
The selected material must be environmentally friendly. Do not take toxic plastics and non-food-painted boards. For kitchen utensils are best suited:
- plywood;
- birch bark;
- wooden mat;
- bamboo.
Important! For the manufacture of kitchen utensils, only those types of wood that do not have a specific smell are suitable. Softwoods such as spruce and pine are not suitable because of their characteristic persistent aroma. Bread quickly absorbs odors.
To mount individual nodes and parts you will need:
- self-tapping screws or small nails;
- canopies;
- glue for carpentry;
- furniture stapler;
- jigsaw;
- paint or stain.

The doors of the breadbasket differ in the way they function. They can:
- move apart in different directions;
- open in the usual way;
- go up and fold like horizontal blinds.
Fasteners for doors are selected according to their type.
In addition to material and fixtures, you need to purchase a suitable tool. A standard set for carpentry works.
Forms and types of homemade bread bins
Bread can be stored in bread bins having the form:
- open deep dish;
- containers with doors;
- boxes with a lid.
Bread bins can be made from the most unexpected materials. Home craftsmen manage to build this kitchen utensil from:
- plastic bottles;
- thick paper;
- Newspapers
- vines;
- cotton or linen fabric;
- clay.

The most common bread bins in everyday life are made of wood and vines. There are wicker boxes in almost every home. They differ in shape and size, they are united by functional purpose.
Some craftsmen create wicker kitchen utensils from plain paper. To do this, the sheets are folded with a tight tube and glued together. Then they are intertwined, creating unusual things. At the final stage of manufacture, the surface of the product is covered with a layer of primer and paint. Paper tubes can be painted in different colors at the very beginning of the manufacture of utensils.
Having certain skills in working with wood, a bread storage container can be hollowed out from a single piece of wood. Clay kitchen utensils can be made by any person, provided that he has the opportunity to burn the finished molding in a professional oven.
Attention! The fashion items made in the Russian style. Kitchen decoration can be birch bark. A stylish and beautiful bread tray is woven simply enough. It is difficult to find and correctly prepare the birch bark. It should be soft enough at the time of packaging.
Measurements and drawings
A preliminary sketch of the future product. It should take into account the specifics of the selected material. A drawing is created based on the drawing and the original dimensions.
For such a product, you need to take into account the average amount of bread consumed by the family. In other words, the size of the breadbox depends on the number of bakery products that will be stored in it.
The container must have depth, height and length. All of these parameters should take into account the size of standard bread rolls. At the same time, baking should fit freely in the box.
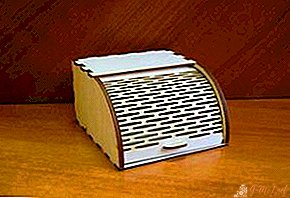
A factory bread box with shutter doors easily holds 3-4 loaves inside.
Drawings for a wooden product can be drawn immediately on plywood or previously on a sheet of paper. It looks something like this:
The bread box yourself: step by step instructions
To make the product according to the drawing, you need to prepare the following tools and materials:
- small wooden or plywood boards;
- mat for sushi;
- jigsaw;
- sand paper;
- small nails;
- furniture stapler;
- glue for bonding PVA wood;
- handle for the door.
The work is carried out in the following sequence:
- first of all, a drawing of the details is drawn on the surface of the plywood piece;
- all walls and covers are cut out with a jigsaw;
- the sides of each board are thoroughly sanded;
- the design is assembled according to the drawing.
In the drawing, the numbers indicate the structural details of the future product:
- two rectangles with units is the bottom of the bread box;
- the third rectangle with the number 1 - the back panel;
- the fourth unit is the top;
- deuces are sidewalls;
- number 3 - front panel.
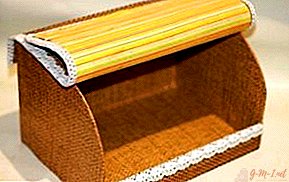
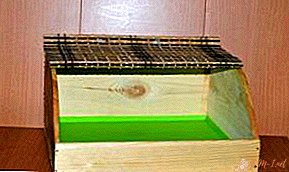
The upper corners on the side walls are best rounded off, so it will be easier to fix the mat.
The mat in this design works as a door. It is attached using a furniture stapler. The product is ready, it remains to put any suitable mat on the bottom of the bread box. It can be made from food grade plastic or fabric.
Bread box - a vase can be made of paper and a plastic bottle. In this case, a five-liter capacity is used as a mold. The work goes in the following sequence:
- A plastic bottle is cut down from the neck. The result should be two equal parts.
- Paper (newspapers) is torn into small pieces.
- The plastic form is coated with vasilin.
- Pieces of paper are glued one after another on the surface of the form.
- Each paper layer is abundantly greased with PVA glue, the total layers should be 5-6.
- The glued form is set aside for several days until completely dry.
- After the glue has completely dried and the papier-mache has become hard, it can be removed from the base.
- In the same way, a stand is made, only as a source form they take a deep plate.
The resulting parts of the product are coated with paint. You can decorate a breadbox in any available way:
- to draw;
- paste over with beads;
- make a mosaic of painted pea halves.
For those who sew and knit, the easiest way is to make a beautiful container for baking from flaps and threads.
There is no restriction or general recommendations. For embroidered shapes, inner liners are made of cardboard. These devices give rigidity to soft tissue walls. Knitwear starch.
Birch bark wicker is easy to make if you follow the following rules for the procurement of material:
- birch bark is removed only from sawn trees or those that are subject to felling;
- the most plastic bark on trees in the spring-summer period; by autumn, it is coarsened;
- tubercles and irregularities are removed from the surface of the cut material;
- the prepared raw materials are boiled for 30 minutes;
- after boiling, the birch bark strips are dried;
- dried birch bark is cut into ribbons of the same width, after which the material is completely ready for work.

The type of weaving is chosen according to your own taste. It can be a standard weave of strips with a rug. This is the easiest way for beginners. Parts of the product are best made individually, and then connect the entire structure together.
No matter what materials the kitchen utensils are made of, the main thing is that they are made carefully and tastefully. In this case, the time and effort spent will produce the desired result.
Leave Your Comment