 Often in everyday life there is a need for a long time to keep food refrigerated without a refrigerator. In this case, a cooler bag can help out. It is difficult to do without it in travel or a country trip.
It is also indispensable when creating special conditions for the transportation of certain drugs. And even without leaving home, housewives often feel the need for such a bag.
For example, when a large feast is organized, and more products are prepared than the existing refrigerator can accommodate.
If there is no such necessary thing, it is not necessary to rush to the store! You can make it yourself.
Making a portable version of the cooler bag
You can ensure the quality of the portable thermal bag with the help of correctly selected materials.
Base selection
 In the manufacture of a portable refrigerator, we will take into account that this should be a convenient product for carrying. Therefore, as an external cover you will need a capacious bag with reliable handles. Well suited for this shopping, sports, travel and even beach bags.
Important! When choosing the basis for a cooler bag, give preference to bags made of durable water-repellent materials.
It is imperative to check the reliability and durability of the zipper: the cooler bag must be tightly fastened.
Sizing and making patterns
Having picked up a bag suitable for a cover, we begin production. Inside the container should repeat the shape of the selected bag, but not coincide with its size, but be smaller. Then it can be conveniently placed in a case. A pattern helps to avoid size errors. Measure all the components of an existing bag: bottom and top, front and back sides, sides. The quality of the whole product depends on the accuracy of the measurement.
Attention! The inner surface is made smaller than the outer. To do this, from external measurements of each part, you need to subtract 5-7 cm.
Then draw up a diagram, which in finished form should have the shape of a cross. All blocks of the pattern are in the form of rectangles.
- Centre - 1 rectangle: bottom.
- Right and left of center - 1 rectangle: sides.
- Up from the center - 1 rectangle: front.
- Down from the center - 2 rectangles: back and cover.
Selection of materials
 Proper selection of materials for making a cooler bag with your own hands helps to ensure reliable preservation of the cold.
For work you will need:
- Insulation
As an affordable and high-quality insulation, foilizolone has proven itself well. It consists of special foamed polyethylene, on the surface of which foil is applied on one or each side. Any kind is suitable for a bag, but two-sided will perform the task of preserving the cold better.
- Scotch
You can connect the internal details of the bag with any tape. It is more convenient if it is bilateral. And the use of metallized adhesive tape, which has an additional layer of foil, will not only hold together parts of the bag, but will also become a heat reflector.
- Zipper or Velcro
Think in advance how your bag will be closed. For this, it is best to use lightning.
You can also make an additional valve on the top of the bag to put it on the front side and fasten it with Velcro. The valve needs to be added to the pattern in the form of an additional rectangle that connects to the lid of the bag.
Connect the parts of the bag
Having prepared the materials and the pattern of the inner container of the cooler bag, we move on to the main part of the work.
- According to the pattern, we cut out the blank of the bag from the isolon.
- We transfer to the isolon the inner sides of the rectangles indicating where the parts of the bag connect: the center with the side, the back with the top, etc.
- We bend the cut material along the internal lines applied to it.
Important!When using a single-sided foil isolone, make sure that its surface with the foil becomes the inner surface of the container.
- When using a zipper, sew it to the insulation.
- We connect the parts of the resulting isolon box. It is best to first "sketch" them: fasten with sewing pins and give the product a shape. Then fasten the joints with adhesive tape.
- Strengthen the joints. To strengthen and shape, each joint can be additionally glued with a layer of tape on the inside and outside. You can also pre-strengthen the joints with insulation strips that remained after cutting the pattern. They are fixed using double-sided tape. Additionally, you can once again glue these strips on top with tape.
- We insert the internal block into the external case and carefully straighten it. The resulting portable refrigerator can already be used!
- In conclusion, you can fill the available free space between the cover and the container with material: synthetic winterizer or batting, or you can even use pieces of an old blanket.
- The finished product will give a finished look fastening of the external and internal parts. They can be stitched or tightly joined using double-sided tape.
Making a car refrigerator
 Car cooler bag has some originality. We’ll tell you how to make a car thermobag.
Base selection
The automobile version does not provide for manual transportation, so the implementation of such a product does not require the selection of a suitable bag-cover.
The basis for a car bag refrigerator can be:
- Cardboard box;
- A box of plywood;
- Plastic container.
The main thing is that the chosen base be strong and durable, have smooth walls, and be roomy. When using a plastic base, make sure that it is suitable for food storage.
Upholstery selection
In order for the ordinary container selected for the base of the bag to acquire the capabilities necessary for a thermal bag, you need to choose the right material. It will be used for interior decoration of the container.
Insulation
 For the insulation, you can use different materials.
Often they use ordinary foam. It is lightweight and does not make the bag heavier, holds heat well and at the same time has a low price. When using, such a lack of foam is revealed: often it begins to crumble during cutting.
Penoplex retains all the advantages of polystyrene, but does not have its drawback. This material is denser, at the same time it is easy to cut and does not crumble. But it also costs more than polystyrene.
Penoplex and polystyrene do not have a metallized surface. Therefore, they should be supplemented with another insulation - foil isolone.
Scotch
 As in the manufacture of a portable bag, adhesive tape helps to connect the details of a car refrigerator. It is better to give preference to metallized tape.
The device of a car bag cooler
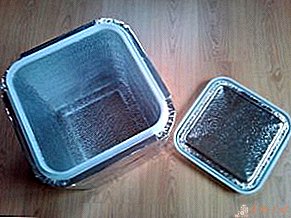
To make a thermobag for the car, we will specify the device. The food container consists of several layers:
- 1 layer of insulation - cut parts of polystyrene or foam. They are carefully cut to the size of the base and inserted into it. Insulation for strength can be connected to the walls of the base with glue without acetone or double-sided tape. It will be useful to tape the joints between the parts.
- 2 layer of insulation - isolon. It overlays on top of the foam or foam, making the inside shiny due to the foil. Isolon is also attached with double-sided tape.
- External joints are glued with tape.
- Optionally, you can make an additional layer for the container - the outer one. An isolon is also used for this. Now its foil portion is made the outer surface of the container.
- The cover of the thermobag is carried out according to the same principle. Its base is cut out of plywood or cardboard. Its dimensions should correspond to the dimensions of the outer perimeter of the upper part of the refrigerator. Part of the foam (foam) is cut out and glued to the lid on the side that will be internal.
Important! The size of the foam part must strictly match the inside perimeter of the top of the refrigerator. Then the foam will fit tightly into the container, which will become almost airtight.
On top of the first layer of insulation, a second, of foilizolone, is applied. On the outside of the lid, a handle is fastened to open the refrigerator. You can also attach the cover with furniture hinges.
Handles for transporting the manufactured cooler bag are made of a strong wide tape, always passing it under the bottom of the bag.
Important Nuances
 Special cooling elements help to make the car cooler bag more practical and prolong the preservation of the cold. They can also be made independently. Frozen salt water bottles can serve as cold accumulators. A saturated salt solution can be frozen not only in bottles, but also in special bags for freezing. And you can freeze a gel swollen from water, pulled out of an unused baby diaper. It is placed in a special bag and also frozen.
- Proper loading of the cooler bag is also important for the duration of its operation. Pre-frozen foods are recommended to be individually wrapped in cling film before being placed in a bag. Products must be alternated with cooling elements.
- It is important to fully utilize the volume of the refrigerator: tightly placed frozen foods better maintain the temperature inside the container. Be sure to fill the free space with drinks or just paper.
 Special cooling elements help to make the car cooler bag more practical and prolong the preservation of the cold. They can also be made independently. Frozen salt water bottles can serve as cold accumulators. A saturated salt solution can be frozen not only in bottles, but also in special bags for freezing. And you can freeze a gel swollen from water, pulled out of an unused baby diaper. It is placed in a special bag and also frozen.
Making a cooler bag with your own hands is simple and inexpensive. And the homemade bag brings many benefits!
Leave Your Comment