 Linoleum floors were invented in the mid-19th century using materials such as linseed oil, rosin and cork dust. Given its low cost and the variety of styles and finishes that are available, linoleum is growing in popularity. Although it is a low-maintenance product, it can be scratched. In addition, aligning the seams of several linoleum sheets - over large surface areas - can be difficult. When installed correctly, linoleum forms a seamless water-repellent film that is easy to maintain.Linoleum is sold in rolls that can be cut to fit the coating or modular tile.
Linoleum sizes
Running meter - 1 m per coating width. In other words, when the width of the roll is three meters, it follows that 1 linear meter is part of the coverage one by three meters. That is, in 1 running meter it will turn out three meters in a square of a covering. As a rule, the manufacturer indicates how many linear meters per roll or square.
Speaking about how many meters of linoleum are in one roll, it can be noted that standard rolls have a width of 1.8 to 2.1 meters and usually have a minimum length of 3 meters or a maximum length of 35 meters.
Linoleum width per roll
The average roll width is from 1.8 to 2.1 meters. However, the average length of the rolls varies greatly depending on the manufacturer. Although most sheet rolls are sold by the manufacturer about 15 meters, some can reach 3.6 meters and can be cut into pieces.
- 0.5 x 0.5 m (19.685 in x 19.685 in).
- 0.5 x 0.5 m (19.685 in x 9.48 in).
- 1 x 0.25 m (39.37 "x 9.48" inches).

Linoleum area
To determine the area in square meters, multiply the length by the width. When measuring, round the reading. For irregularly shaped floors, divide them into separate sections, calculate the square meters in each, and then put them together.
How to calculate the required roll quantity for a room
 Place linoleum in the room in which you plan to install it one or two days before installation. He must settle in the room. Keep the room at your usual temperature.
- Install APA, the bottom plywood on top of the existing floor, if the existing layer is not even, smooth or dry. You can use plywood with a thickness of 3/8, 1/2 or 1/4 inch.
- Vacuum over the backing to remove dust that might have settled on it during installation.
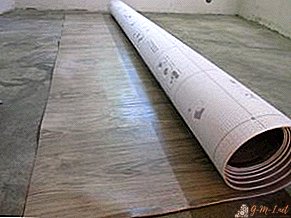
- Place the breadboard paper that you can buy at the local center for the sale of construction products - on the floor that you want to cover with linoleum. Start at the longest wall and go around the room, adding more paper to create an exact copy of your floor. Trim obstacles such as toilets, kitchen islands, and pipes using a utility knife and straight edge. Leave 1/8 inch of the space between the wall and the pattern on the paper. This will help you leave the expansion gap on the linoleum itself.
- Write "top" on the template before folding it and moving it to the floor of linoleum.
- Expand linoleum in a large room, top side up. Expand your drawing and place it on top of linoleum, also top side up.
- Place one sheet of linoleum on the first sheet if your floor is wider than the roll. Make sure the pattern fits perfectly and overlays the sheets per inch. Tape them along with duct tape.
- Cut an extra inch using the straight edge and multi-purpose knife and cutting both sheets at the same time. This ensures that both edges are flush with each other, with no gaps or overlaps. Tape cut the seams together. Repeat until the entire paper drawing is covered with linoleum and the seams are not connected correctly.
- Trace along the drawing using a felt-tip pen. Delete template.
- Cut along the marker line using a straight edge and multi-purpose knife.
- Roll up and take it to the room where you plan to install it.
- Before applying glue, install linoleum in place to make sure that you have correctly created the pattern. Place the largest piece on the backing first.
- Flip half of your first piece and add glue - according to the manufacturer's instructions - using a notched trowel. Press linoleum firmly into the glue, moving from the center to the edge. Wipe off excess glue with a damp cloth. Continue until the entire floor is installed.
- Apply pressure to the floor seams. Use a seam bead first. Then roll out the entire floor — if glued directions require it — use a floor roll or standard kitchen rolling pin.
- Allow the glue to dry, and then apply joint sealant to the joints to block moisture. Wipe off excess seam sealant using a paper towel.
- Wait 24 to 72 hours before using the floor.
 Place linoleum in the room in which you plan to install it one or two days before installation. He must settle in the room. Keep the room at your usual temperature.
You will need:
- Vacuum.
- Felt-tip pen.
- Knife.
- Straight line.
- Suture sealant.
- Seam roller.
- Floor roller or rolling pin.
- Glue.
- Patterned paper.
- Notched trowel.
- Wet rag.
- Plywood APA.
- Insulation tape.
REFERENCE. When installing over concrete, be sure to install a moisture barrier under the base. Use a plastic film from 4 to 6 mm thick. Floor glue and linoleum must be the same brand to ensure proper adhesion.
Do not lay linoleum on concrete if it is less than four months old. This period ensures that any moisture in the concrete has evaporated. Use floor glue in a well-ventilated area.

Leave Your Comment